Zeal For Wisdom
High Availability and Disaster Recovery
High Availability and Disaster Recovery
- The main point of a high-availability strategy is to keep the critical data as available as possible
- The different high availability solutions provide ways to keep a database system online even at the time of hardware failure or other unforeseen incidents
- Disaster recovery efforts are all about restoring systems and data to a previous acceptable state in the event of partial or complete failure of computers due to natural or technical causes
Recovery Point Objective(RPO)
- The RPO is the amount of data one can lose, measured by time
- It is likely to be different from system to system and application to application
- For instance, a critical system may have an RPO measured in minutes while a non-critical one may have it measured in days
Recovery Time Objective (RTO)
- How much time is needed to bring systems online incase a disaster happened
- DBAs need to work closely with other members of the IT team to establish the RPO and RTO
High availability and Disaster recovery Solutions
- Mirroring
- Log Shipping
- Replication
- AlwaysOn availability
Mirroring
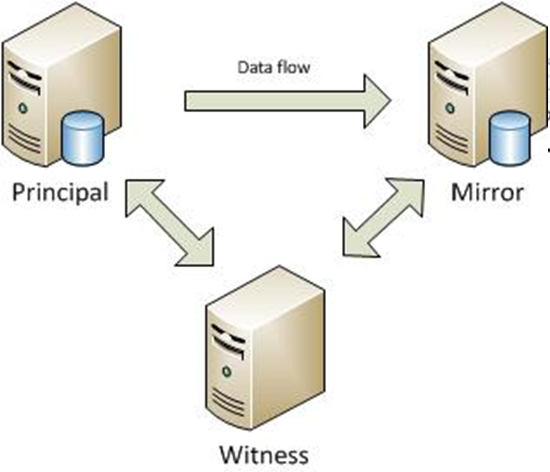
- SQL Server database mirroring is a disaster recovery and high availability technique that involves two SQL Server instances on the same or different machines. One SQL Server instance acts as a primary instance called the principal, while the other is a mirrored instance called the mirror.
In special cases, there can be a third SQL Server instance that acts as a witness
- Principal Instance - Take a full backup and a log backup as well
- Copy the full/log backups from Principal Instance to Mirror instance
- Mirror Instance - Restore with NORECOVERY option the full backup
- Mirror Instance – Apply the log backup
- Principal Instance - Start synchronization
- From the Principal server, right click the database and choose "Tasks" | "Mirror" or choose "Properties" | "Mirroring"
- Click the "Configure Security" button and click "Next >" if the Configure Database Mirroring Security Wizard intro screen appears. The next screen should be the Include Witness Server screen
- The next screen will give you options to configure the Principal Server Instance
- The next screen will give you options to configure the Mirror Server Instance
- To connect to the Mirror server instance we will need to click the "Connect..." button then select the mirror server and provide the correct credentials
- Once connected, we also notice our endpoint name is Mirroring and we are listening on port 5022. Click "Next >" and you'll see the Service Accounts screen
- If you see the big green check mark that means Database Mirroring has been configured correctly. However, just because it is configured correctly doesn't mean that database mirroring is going to start... Next screen that pops up should be the Start/Do Not Start Mirroring screen
When using Windows Authentication, if the server instances use different accounts, specify the service accounts for SQL Server. These service accounts must all be domain accounts (in the same or trusted domains). If all the server instances use the same domain account or use certificate-based authentication, leave the fields blank. Since my service accounts are using the same domain account, I'll leave this blank. Click "Finish" and you'll see a Complete the Wizard screen that summarizes what we just configured. Click "Finish" one more time
Log Shipping
- Log Shipping is a basic level SQL Server high-availability technology that is part of SQL Server. It is an automated backup/restore process that allows you to create another copy of your database for failover
- Log shipping involves copying a database backup and subsequent transaction log backups from the primary (source) server and restoring the database and transaction log backups on one or more secondary (Stand By / Destination) servers. The Target Database is in a standby or no-recovery mode on the secondary server(s) which allows subsequent transaction logs to be backed up on the primary and shipped (or copied) to the secondary servers and then applied (restored) there
- Permissions
To setup a log-shipping you must have sysadmin rights on the server - Minimum Requirements
SQL Server 2005 or later Standard, Workgroup or Enterprise editions must be installed on all server instances involved in log shipping. The servers involved in log shipping should have the same case sensitivity settings. The database must use the full recovery or bulk-logged recovery model A shared folder for copying T-Log backup files SQL Server Agent Service must be configured properly In addition, you should use the same version of SQL Server on both ends. It is possible to Log Ship from SQL 2005 to SQL 2008, but you can not do it the opposite way. Also, since Log Shipping will be primarly used for failover if you have the same versions on each end and there is a need to failover you at least know you are running the same version of SQL Server - On the primary server, right click on the database in SSMS and select Properties. Then select the Transaction Log Shipping Page. Check the "Enable this as primary database in a log shipping configuration" check box
- The next step is to configure and schedule a transaction log backup. Click on Backup Settings... to do this
- If you are creating backups on a network share enter the network path or for the local machine you can specify the local folder path
- In this step we will configure the secondary instance and database. Click on the Add... button to configure the Secondary Server instance and database. You can add multiple servers if you want to setup one to many server log-shipping
- When you click the Add... button it will take you to the below screen where you have to configure the Secondary Server and database. Click on the Connect... button to connect to the secondary server. Once you connect to the secondary server you can access the three tabs as shown below
- In this step you can specify how to create the data on the secondary server. You have three options: create a backup and restore it, use an existing backup and restore or do nothing because you have manually restored the database and have put it into the correct state to receive additional backups
- In this step you can specify how to create the data on the secondary server. You have three options: create a backup and restore it, use an existing backup and restore or do nothing because you have manually restored the database and have put it into the correct state to receive additional backups
- Here you have to specify the database restoring state information and restore schedule. This will create the restore job on the secondary server
- In this step we will configure Log Shipping Monitoring which will notify us in case of any failure. Please note Log Shipping monitoring configuration is optional
- Click on Settings... button which will take you to the "Log Shipping Monitor Settings" screen. Click on Connect ... button to setup a monitor server. Monitoring can be done from the source server, target server or a separate SQL Server instance. We can configure alerts on source / destination server if respective jobs fail. Lastly we can also configure how long job history records are retained in the MSDB database. Please note that you cannot add a monitor instance once log shipping is configured
- Click on the OK button to finish the Log Shipping configuration and it will show you the below screen
Replication
- Replication is a set of technologies for copying and distributing data and database objects from one database to another and then synchronizing between databases to maintain consistency. Using replication, you can distribute data to different locations and to remote or mobile users over local and wide area networks, dial-up connections, wireless connections, and the Internet
- Microsoft SQL Server supports three types of database replication. This article provides a brief introduction to each of these models, while future articles will explore them in further detail. They are:
- Snapshot replication: The publisher simply takes a snapshot of the entire replicated database and shares it with the subscribers
- Transactional replication: offers a more flexible solution for databases that change on a regular basis. With transactional replication, the replication agent monitors the publisher for changes to the database and transmits those changes to the subscribers. This transmission can take place immediately or on a periodic basis
- Merge replication: allows the publisher and subscriber to independently make changes to the database. Both entities can work without an active network connection. When they are reconnected, the merge replication agent checks for changes on both sets of data and modifies each database accordingly. If changes conflict, the agent uses a predefined conflict resolution algorithm to determine the appropriate data. Merge replication is commonly used by laptop users and others who cannot be continually connected to the publisher
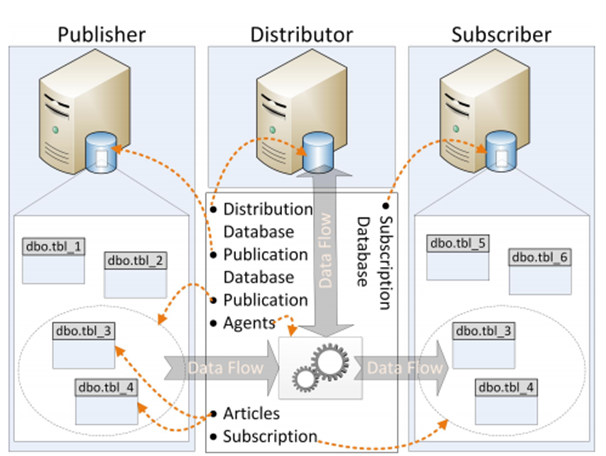
- Publisher: It is a source database where replication starts. It makes data available for replication. Publishers define what they publish through a publication
- Article: Articles are the actual database objects included in replication like tables, views, indexes, etc. An article can be filtered when sent to the subscriber
- Publication: A group of articles is called publication. An article can’t be distributed individually. Hence publication is required
- Distributor: It is intermediary between publisher and subscriber. It receives published transactions or snapshots and then stores and forwards these publications to the subscriber. It has 6 system databases including distribution.
- Subscriber: It is the destination database where replication ends. It can subscribe to multiple publications from multiple publishers. It can send data back to publisher or publish data to other subscribers
- Subscription: It is a request by a subscriber to receive a publication. We have two types of subscriptions - push and pull
- Push Subscriptions: With this subscription, the publisher is responsible for updating all the changes to the Subscriber without the subscriber asking those changes. Push subscriptions are created at the Publisher server
- Pull Subscriptions: With this subscription the subscriber initiates the replication instead of the publisher. The subscriptions are created at the Subscriber server
- Snapshot Agent: It is an executable file that prepares snapshot files containing schema and data of published tables and db objects. It stores the files in the snapshot folder, and records synchronization jobs in the distribution database
- Distribution Agent: It is used with snapshot and transactional replication. It applies the initial snapshot to the Subscriber and moves transactions held in the Distribution db to Subscribers. It runs at either the Distributor for push subscriptions or at the Subscriber for pull subscriptions
- Log Reader Agent: It is used with transactional replication, which moves transactions marked for replication from the transaction log on the publisher to the distribution db. Each db has its own Log Reader Agent that runs on the Distributor and connects to the Publisher
- Merge Agent: It is used with merge replication. It applies the initial snapshot to the Subscriber and moves incremental data changes that occur. Each merge subscription has its own Merge Agent that connects to both the Publisher and the Subscriber and updates both. It captures changes using triggers
- Queue Reader Agent: It is used with transactional replication with the queued updating option. It runs at the Distributor and moves changes made at the Subscriber back to the Publisher. Unlike Distribution Agent and Merge Agent, only one instance of the Queue Reader Agent exists to service all Publishers and publications for a given distribution db
Types Of Replication
- Snapshot Replication
- Transactional Replication
- Merge Replication
Configuring Replication
- Configuring distributor
- Configuring publisher
- Creating publication of required type
- Creating subscription(s)
Next -> Select ‘SERVER2’ will act as its own distributor;
Uncheck the check box present at Server2 -> Add
Select instance Server1
Go to distributor -> Databases -> Find the new database “Distribution”
Go to Security -> Logins -> Find a new login “Distributor_admin”
Go to Server Objects -> Linked servers -> Find new linked server “repl_distributor”
Right Click on Replication -> Select distributor Properties
Transactions stored in distribution database are removed after 72 hrs and agents history is removed after 48 hrs. To view snapshot folder path -> Click on publishers -> click on browse button (…) present to right side of publisher name
Go to SQL Server Agent -> Jobs -> Find 6 new jobs are created automatically
Creating Snapshot Publication Go to publisher (Server1) -> Replication -> Right Click on Local Publications -> New publication Next Select second option -> Click on Add -> Select Distributor instance (Server2)
Connect ? Next Enter password of Distributor_admin login which we have mentioned while configuring publisher.
NextSelect required database..
Next Select “Snapshot Publication” ->
NextSelect required tables ->
Next Click on security settings Select as follows Go to publisher -> Replication -> Local publications -> Find new publication is created
Go to distributor -> SQL Server Agent -> Jobs -> Find snapshot agent job was created
Creating Subscription
Go to publisher -> Replication -> Local Publications -> Right Click on SSISDBSP -> New Subscription
Next Select the publication name: SSISDBSP
Next Select Push subscriptions
Add Subscriber -> Select third instance (Server1\test) -> Connect
Next Under Subscription Database if there is no database exists with same name -> Select New database -> Enter Database Name -> OK -> NextClick on browse button (…) under distribution agent security page. Select “Run under Agent Service Account” and “By impersonating the process account” options as both distributor and subscriber’s service accounts are same. If the service account of subscriber is different, then create a login in subscriber with sysadmin privileges then mention that login details
NextUnder Agent Schedule -> Select “Run Continuously” Under Initialize when select -> Immediately Next -> Next -> Finish
Verifying Replication
Go to publisher perform some changes in any table present in publicationGo to distributor run Snapshot Agent Job
Go to subscriber observe the changes in the respective table
AlwaysOn
Prerequisites
- Windows Server Failover Cluster (WSFC)
- SQL Server 2012 Enterprise Edition
- Same SQL Server collation for all replicas
- Two to Five SQL Server Instances acting as replicas
Windows Failover Clustering Configuration for SQL Server 2012 AlwaysOn Availability Groups
- Launch Failover Cluster Manager from within the Server Manager console
- Within Failover Cluster Manager, click the Create Cluster link and after that Validate Cluster
- Validate a Configuration Wizard dialog box, click Next
- In the Select Servers or a Cluster dialog box, add the server hostnames of the SQL Server instances that you want to configure as replicas in your Availability Group. Click Next
Windows Failover Clustering Configuration for SQL Server 2012 AlwaysOn Availability Groups
- In the Testing Options dialog box, make sure that the option Run all tests (recommended) is selected. Click Next
- In the Confirmation dialog box, click Next
- In the Summary dialog box, click Finish to create the Windows Failover Cluster
- In the Access Point for Administering the Cluster dialog box, enter the virtual server name and virtual IP address of your Windows Server Failover Cluster
Windows Failover Clustering Configuration for SQL Server 2012 AlwaysOn Availability Groups
- To configure the cluster quorum configuration to use a file share, right-click on the cluster name, select More Actions and click Configure Cluster Quorum Settings… We will be configuring a file share witness for our cluster quorum setting. By default, the wizard will configure the cluster to use Node Majority
- Click Next
- In the Select Quorum Configuration page, select the Add or change the quorum witness option. Click Next
- In the Select Quorum Witness page, select the Configure a file share witness (recommended for special configuration) option. Click Next
- In the Configure File Share Witness page, type path of the file share that you want to use in the File Share Path: text box. Click Next
- In the Confirmation page, click Next
- In the Summary page, click Finish
Enable SQL Server 2012 AlwaysOn Availability Groups Feature
Once the Windows Server Failover Cluster has been created, we can now proceed with enabling the AlwaysOn Availability Groups feature in SQL Server 2012. This needs to be done on all of the SQL Server instances that you will configure as replicas in your Availability Group. To enable the SQL Server 2012 AlwaysOn Availability Groups feature, In the Properties dialog box, select the AlwaysOn High Availability tab. Check the Enable AlwaysOn Availability Groups check box. This will prompt you to restart the SQL Server service. Click OK.Restart the SQL Server service.
Create and Configure SQL Server 2012 AlwaysOn Availability Groups
- Open SQL Server Management Studio. Connect to the SQL Server instance
- In Object Exporer, expand the AlwaysOn High Availability folder. Right-click on the Availability Groups folder and select the New Availability Group Wizard… option. This will launch the New Availability Group Wizard
- In the Introduction page, click Next
- In the Specify Availability Group Name page, enter the name of the Availability Group in the Availability group name: field. Click Next
- In the Select Databases page, select the checkbox beside the database that you want to include in your Availability Group. The databases have to be in Full recovery model prior to joining them in the Availability group. Click Next
Create and Configure SQL Server 2012 AlwaysOn Availability Groups
- In the Specify Replicas page, under the Replicas tab, click the Add Replicas button and connect to the other SQL Server instances that you joined as nodes in your Windows Server Failover Cluster. Configure the following options
Automatic Failover (Up to 2) : Checked
Synchronous Commit (Up to 3) : Checked
Readable Secondary: No
- In the Endpoints tab, verify that the port number value is 5022
- In the Listener tab, select the Create an availability group listener option. Enter the following details. Listener DNS name: Name that you will use in your application connection string Port: 1433
- Click the Add… button to provide an IP address. In the Add IP Address dialog box, enter your preferred virtual IP address in the IPv4 Address field. Click OK. Click Next
- In the Select Initial Data Synchronization page, select the Full option. Provide a shared folder that is accessible the replicas and that the SQL Server service account used by both replicas has Write permissions to
- In the Validation page, verify that all validation checks return successful results. Click Next
- In the Summary page, verify all configuration settings and click Finish. This will create and configure the AlwaysOn Availability Group and join the databases
- In the Results page, verify that all tasks have been completed successfully
Zeal For Wisdom
Learn Today For Better Tomorrow